Pressure Cooker Pumpkin and Squash Puree


The husband and kiddos gave me an Instant Pot for Christmas.  During our stay at the rental house while our new house was being built, it became our go to for cooking since our kitchen was tiny.  So far I make pork ribs, apple sauce, and yogurt regularly in it.  I've ditched the Crockpot and got a glass lid for this bad boy too.  It rarely leaves the top of the counter these days, even in the new house.


In the refrigerator I had an acorn squash and another random squash I picked up the last time I was at Trader Joes.  We also had a few sugar pumpkins from our trips to the pumpkin patch this year.  So I decided it was time to prep them for winter.  I usually do this every year and then freeze the puree for later use.  

It has been such a warm fall and today is another warm day so instead of cranking on the oven, I thought I would try out the Instant Pot.  After a quick Google search, I cut them up and scooped them out.  Honestly I grabbed the little scooper from the pumpkin carving kits and it worked perfect to clean out the seeds.  I cut them into chunks so they would fit better in the Instant Pot, added the rack, and filled it up.  I added 1 cup of water and set it for 20 minutes on manual.  


Timing was the harder part as there was quite a variation in how long to cook them.  I started with 20 minutes on manual for the squash with a quick release.  I maybe could have only gone 15 as the flesh just fell off the peel. The first round of pumpkin I did 20 minutes on manual with a quick release too. The second time I bumped it down to 15 minutes on manual with a quick release.  I continued with this time for the rest of the pumpkin. 


There was no battle separating it.  I do suggest letting it cool for a few minutes before handling as I burned my fingers a bit.  I then just laid it down on a cutting board peel side down and just gently scraped the flesh off with a silicone spatula.  Easy peasy!  To get it nice and creamy blend it with your blender or emulsion blender.  You can use the water from cooking to thin it out if needed.


I continued to cook all the pumpkin chunks. I'm sure it would have been faster to bake them all in the oven, but I always end up burning the bottoms of them or forget about them until they are black and starting to flame. Since I was cleaning and caring for sick kiddos while these cooked, it was the quickest and easiest route.  I never did change or add to the water.  I think I will save it for soup or liquid in bread.  No need to waste good pumpkin infused water! 


All in all this is now be my go to for cooking pumpkin and squash for purees.  Helpful tip...stack the chunks skin side down.  It makes removal a bit easier and you won't lose the yummy goodness into the water.  I ended up with about 3 cups of squash puree and about 12 1/2 cups of pumpkin puree.  I topped off the pumpkin broth to make 2 cups of broth.
  

Sorry We Can't Play Magnet


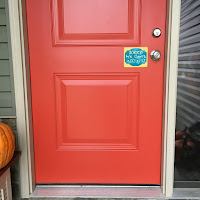
Since moving to our new house, we have little guest showing up through out the day.  There are times when my littles aren't available to play.  Of course when the guests show up mine will beg to play: mean mom me has to say no over and over. I put this file together out of desperation, constant doorbell ringing and "we can't play right now" was getting a little much.

To put this together I used all things I had stashed in my craft closet since there was that desperation factor.  I'm a total sucker for clearance aisles at the local craft stores so the there are always good treasures to be found in "THE CLOSET" as my husband calls it.  I couldn't find the little earth magnets I used to show you all.  I use these strong little magnets for my spice tins on my fridge (another post for another day) and thought they would be perfect since our door faces north and we all know how the Nebraska wind can be.

I created this file with Photoshop and Inkscape.  These are my go to programs when I'm feeling creative.  Once it was completed I uploaded it to my Cricut software.  I have to admit I'm not a fan of their software.  You have to have an internet connection to be able to cut.  If you have a less than stellar internet service provider like me or it is a busy Cricut creativity time, it is nearly impossible to get it to work without it crashing and losing all your work.  This is why I tend to create everything elsewhere and upload it all together as a .SVG file.  I do like the machine its self and the option to cut from my smartphone or iPad, though I've just never actually done it.

I painted the little wooden plaque and waxed it since it will be out in the Nebraska elements.  If I had fun spray paint colors on hand I probably would have used that.  Like I said I used what I had on hand.

While it was drying I got to work cutting the vinyl.  I used outdoor (shiny) vinyl.  This is my favorite kind to work with and always have scraps on hand.  I used a random fun and FREE shape from the Cricut library for the turquoise background.  I don't have a subscription to their paid library since I have a bit of a font addiction and can easily make most anything I need.

Once the paint was dry I just placed the turquoise vinyl by hand, eyeballing it.  For the white lettering I used transfer paper....well....clear contact paper.  This is my go to because it's cheap and I can pick it up at the local big box store or grocery store.  No special trip to the craft store or waiting for an online delivery.  I do recommend the actual Contact brand, I have bought other brands before and they just don't seem to work as well.  Do keep in mind, it's not as sticky as transfer paper so you have to work a bit more to get the vinyl to adhere but to me it's much easier to work with.  Lastly I glued a magnet or 2 to the back with a little Gorilla glue, the gel kind, but any super glue would work.


Since posting pictures of our little sign on Facebook, I've had several requests from friends for their own "We Can't Play" magnets.  You can make your own with my free .SVG file by joining my Facebook group.  I have several free .SVG patterns available for personal use and add more all the time.


The Deb Scarf Free Download

I've been working on this crocheted scarf for a few weeks now.  Just doing a few rows every few days in between all the summer madness with the kiddos.  Now that it is finished I think I will wrap it up and store it away until Christmas.  I made it with my mother in mind as she picked out these colors for a different scarf.  It is a little thicker than a lace scarf but warm enough for a cooler spring or fall day.  It would also be dressy enough to wear as a small shawl for an evening event or wedding.

It is available on Ravelry for download now.


Free Peeps Bunnies Machine Embroidery Pattern

Easter is just around the corner so I thought I would offer a new pattern.  You can pick the pattern up at Craftsy.com. The full set of the Peeps bunnies is also available on Craftsy.com and ETSY.com.
Free Peeps Bunny Pattern 


Free Down Syndrom Patterns

I know this is the last day for Down Syndrome Awareness month, but I think these embroidery patterns are perfect any time of the year.  These two designs are free in my Crasftsy store.  Click on the photos to receive your free patterns.
click to snag this free pattern

The Crazy Purse Lady

Oh do I need to say more?  Anyone who loves purses will love this set.  There are both applique and embroidery sets.  Of course you can change the color to meet your needs.  I wonder if someone could make a quilt from these patterns?  I think they would even be cute embroidered on a little girl's onesie or bib!  Just let your imagine run wild.

You can get these pattern sets and many more great sets at www.izabellascloset.com

Slushy Summer Drinks

I thought these new Drink sets were perfect for the summer.  I love having a slushy grown up drink after a long day of chasing the girls.  There is something relaxing sitting on the deck and listening to the rustling of corn with a drink in hand.  I know some people prefer appliques and some do not.  I have two sets of both!  When I made these I think I loved the olive glasses the best and then maybe the glass above.  I hope you are able to enjoy these sets too.  I think they would be perfect for napkins, kitchen/bar towels, or maybe even on an apron!

You can find these designs and many more at www.izabellascloset.com